
Grease and engine sludge aren’t just ugly. They can also affect engine performance and might prematurely foul sensitive engine parts. As oil sludge starts to build up in your engine, you might notice the engine running hot, your oil will look very dark, and your MPG can take an ugly nose dive. You might even get a check engine or oil warning light.
It’s definitely not the sort of thing you want to procrastinate. The repairs for damage caused by oil sludge are going to be much higher than removing it proactively.
If you catch it early, an oil flush, oil change with high-quality oil, special detergents, and additives will help clear oil sludge out before it can cause a serious problem. Then it’s just a matter of carefully degreasing any caked-on grease of the engine. From there, preventing it from coming back comes down to routine maintenance.
What Causes Engine Sludge?
Many things can cause oil sludge, though the most common is going too long in between your regularly scheduled oil changes. Contaminants like coolant get into the oil from something like a blown head gasket, and the overheating effects from stop-and-go driving can further compound the problem.
Addressing these things right away and staying consistent with your routine maintenance will go a long way toward minimizing future problems with oil sludge and caked-on grease.
1. Infrequent Oil Changes

Anytime you go beyond the normal lifespan of your motor oil, it can start to break down. As it oxidizes and loses its lubricating properties, the hydrocarbon chains can start to gum up the oil system and engine components.
2. Contaminated Oil

Moisture in the oil, low-quality additives breaking down, and other contaminants can also gum up and get caked onto the engine. This issue worsens if you go too long between oil changes as the contaminants circulate.
3. Mechanical Faults

Mechanical faults with the oil system, the head gasket, and some of the emissions systems can also introduce contaminants to the oil. Coolant finding its way into the oil from a blown head gasket is one of the more common causes of lingering engine sludge. Even long after the head gasket was fixed!
4. The heat of Stop-and-Go Driving

Excess heat from stop-and-go driving can polymerize hydrocarbon chains in the oil and other additives, causing it to gum onto the surfaces of the engine. This can be compounded by moisture and contaminants in the oil that can also adhere to engine surfaces in the intense heat created by internal combustion.
How Does Oil Sludge Hurt Your Engine
Oil sludge affects the lubricating properties of your engine’s oil system, which increases friction. This can lead to engine overheating, which further breaks down the lubrication potential of your oil in a vicious cycle that increasingly threatens all of your engine’s moving parts.
Oil sludge can also gum up and damage your car’s oil pump. As it starts to fail, you’ll have less oil circulating through the engine. This leads to even more friction heat and the ideal conditions for developing engine sludge.
The excess heat in the engine can also affect sensitive components. Seals like the head gasket, front main oil seal, and rear main oil seal all become more prone to failure in an engine overheating due to oil sludge.
As the oil system gums up, it can also start to affect the cooling system. The radiator and the cooling lines will simply reach the point where they can’t keep up with the heat from friction in the engine and can also be damaged.
Caked-on grease and oil sludge can also hurt the resale value of your car. Even if the engine seems to be running normally, a third-party buyer or a dealership mechanic evaluating the value of your car at trade-in will inevitably give you a lower offer. To them, the presence of excess oil sludge isn’t just a cleaning cost that they have to shoulder, but it’s also a sign that the car hasn’t been properly cared for and will likely have other faults.
Most Likely Places for Caked-On Grease and Oil Sludge Build-Up?
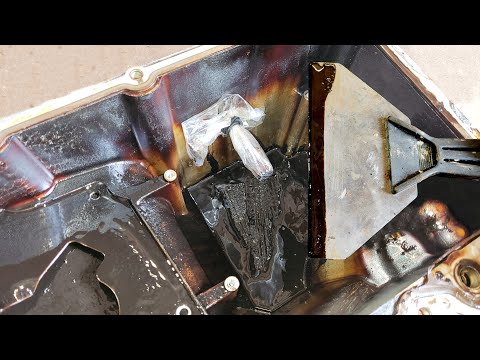
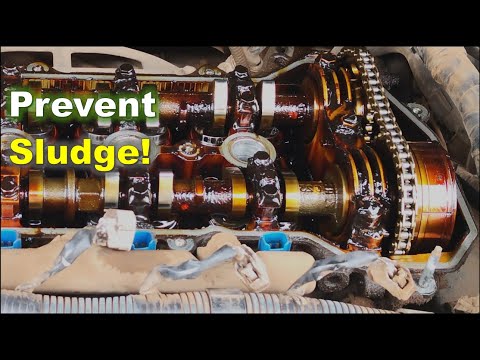
Engine sludge tends to develop first on the top of the engine, inside the oil pan, and on the valve covers. This can hamper engine performance as well as cause the engine to run hot.
There are also some not-so-obvious places where oil sludge can build up, like the oil pickup tube that delivers the oil to the engine’s moving parts.
As the engine’s oil system struggles with excess friction and heat, it can develop leaks on the front and rear main oil seals. Oil can then ooze into the engine bay. If it hits one of the moving parts, like the serpentine belt, the oil can spatter around, landing on hot external engine elements.
The heat from the engine can then start to polymerize the oil, leaving caked-on grease everywhere. In no time flat, you end up with an ugly engine on the outside and gummed up with oil sludge on the inside.
Signs of Oil Sludge in Your Engine
If you’re past the recommended date or mileage range for your next oil change, then your car is at risk of building up oil sludge inside the engine. This can affect performance and cause it to run a little hot. The longer you go, the more likely you are to notice other symptoms of oil sludge and caked-on grease.
1. Poor MPG

If your car’s MPG continues to drop, it’s likely a sign of oil sludge buildup. The moving parts inside the engine are gumming up as the oil pump and other oil system components struggle to keep the engine lubricated.
2. Engine Is Running Hot

The excess friction and heat from oil sludge will gradually increase the heat of the engine block. As the problem worsens, the engine cooling system will struggle to keep up. You’ll likely notice the engine temperature needle starting to climb. It might even get close to overheating in stop-and-go traffic.
3. The Oil Light Comes On

The effect of sludge buildup on the oil pump and oil system drops the oil pressure to the point that it trips the oil warning light on the dash display. It might flash momentarily when you step on the gas to accelerate hard. As the oil pump strains and oil pressure suffers, it will eventually get to the point where the oil warning light comes on and stays on.
4. The Check Engine Light Comes On

Oil sludge’s effects on engine performance will eventually cause the car’s computer to turn the check engine light on. This can happen early in newer cars and those with variable speed timing, as they tend to have more sensitive thresholds for poor oil pressure. When it does, the car’s computer might throw one or more of the following codes.
How to Remove Oil Sludge from an Engine
If you procrastinate to the point that the oil warning light or the check engine light comes on, you might need a mechanic to clean the oil sludge and perform additional repairs.
If you notice the signs of oil sludge and you jump on it early, you might be able to remove a lot of it with a basic engine flush using sludge remover and a high-quality oil change. If you’re a modestly competent DIY mechanic, you might be able to handle it yourself.
Step One: Do an Engine Flush with a Sludge Remover
You can start removing sludge by adding a high-quality engine sludge remover. You pour it into the engine oil just like you would if you were adding oil. Then start the engine and let it idle for a good 10 to 15 minutes.
This will let the sludge remover detergent circulate through the oil system, helping to remove built-up sludge deposits and suspend them in the existing oil. You then place an oil drain pan under the car and pull the oil plug to let all the old oil and loosened sludge come out of the engine.
This will remove the bulk of the sludge deposits but not necessarily all of them, especially if your sludge problem is severe.
Step Two: Make Any Minor Fixes
If your oil sludge problem was caused by or made worse by another mechanical fault, like a bad head gasket, you’d need to make these repairs. Otherwise, you’ll just end up with more contaminants in your oil, which will add to the sludge problem again.
Step Three: Change the Oil
Oxidized, old oil is the biggest cause of oil sludge buildup. You won’t be able to get the sludge out if you’re still running on bad oil.
This is not the time to skimp on oil quality. You want the best oil recommended by the manufacturer for your engine. This is usually a full synthetic or synthetic blend with high viscosity and cleaning additives included.
Step Four: Add an Oil Treatment
When changing your oil, be sure to add some oil treatment formulated to help engines run clean. This might be the same as the oil treatment you used for the initial engine flush. However, the best option is one that’s meant to stay in the oil throughout the life of the oil change.
Step Five: Drive the Car
Different oil and fuel treatments have different mileage recommendations. Usually, the best route is to drive the car for another 500 to 1,000 miles with fresh, high-quality oil and oil treatment.
Step Six: Change the Oil Again
By 500 to 1,000 miles, the additives in the fresh oil change, and the oil treatment will have removed as much oil sludge from the engine as possible. Draining the oil and giving the car another high-quality oil change will give you the cleanest slate possible.
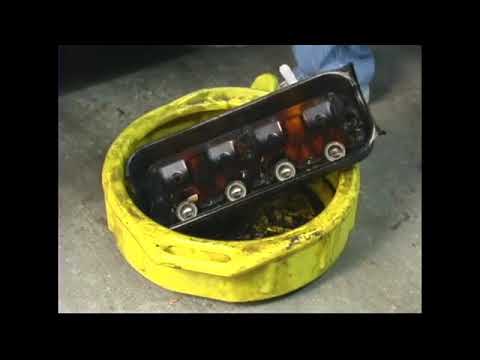
Manually Cleaning Oil Sludge from Engine Components
If the engine still shows signs of oil sludge, you have warning lights or other major performance issues during that 500 to 1,000 miles period. Then manual cleaning is needed, which might push the limits of what a capable DIY mechanic can handle.
If you have a mechanic do it, they’ll likely need to clean the valve covers, the oil pan, and cleaning the siphon, which can run you anywhere from $250 to $500 in mechanic labor costs.
The mechanic will also likely recommend replacing the oil pump. This might seem like they’re piling on, but it’s probably a wise move in the case of severe sludge oil problems on a high-mileage engine. Especially since they’ll already be working with the oil system, meaning the added labor cost won’t be that much.
The part cost for a new oil pump ranges wildly from as little as $75 to as much as $450. However, the real-world average is right around $250.
How to Remove Caked-on Grease from an Engine
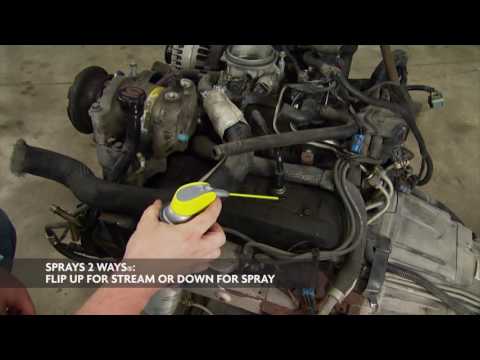
To remove caked-on grease from an engine, you need to get your hands on a quality degreaser. There are a lot of great consumer-grade degreasers out there, like Gunk, Kraken, and Chemical Guys.
A variety of different brushes will also come in handy for cleaning hard-to-reach areas. This is something worth sacrificing a toothbrush and a few firm-bristled chip brushes.
You’ll also need a bunch of clean shop rags or heavy-duty paper towels. Sliding a big piece of cardboard under the car to keep ugly drips from staining the concrete is also a good idea.
Once you’ve got everything you need, you can start cleaning caked-on grease from your engine with the following steps:
If you’re cleaning the engine outside, make sure it’s parked out of the sun to prevent the degreaser from evaporating as you clean.
If you skip this step, you’ll have frustrating little tidbits of stuff messing up brushes and making you go through more shop rags.
If the caked-on grease doesn’t come off right away, it’s no big deal; it might just need a little more spray and another 5 to 7 minutes.
You could also use a garden hose with a gentle spray attachment, but there’s a real risk of water getting through the bags protecting the ECU, alternator, and other sensitive electronics. That’s a risk I’m not willing to take, as it only takes an extra 5 to 10 minutes to manually spray the degreased components.
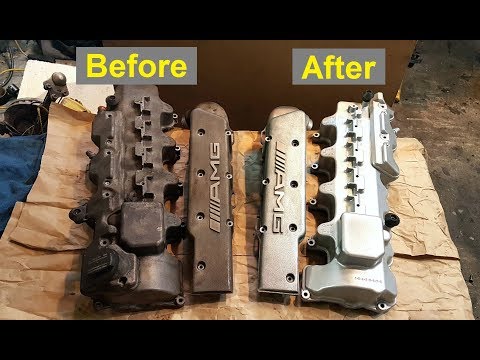
This will give it a nice detailed look and will also help protect it from stuck-on grime for a few weeks. It’s not required, but it’s worth doing if you’re thinking about selling or trading the car in and you want the best possible offer.
How to Prevent Engine Sludge
Routine maintenance and smart driving techniques are the easiest way to prevent the build-up of engine sludge and caked-on grease.
1. Regularly Scheduled Oil Changes
Infrequent oil changes commonly cause engine sludge. Make sure that you are getting the oil changed at the mileage recommended by the type of oil or the manufacturer. Whichever comes first.
2. Choose Quality Oil for Oil Changes
If you have a high-mileage vehicle or you’ve had engine sludge issues in the past, it’s wise to pony up the extra money for a quality oil change. While it might cost you an extra $15 to $20 more than the “Basic” oil change, it will go a long way toward preventing engine sludge. If the automaker recommends synthetic oil, try to choose one that also includes sludge-preventing detergents.
3. Try to Avoid Stop-and-Go Driving
Stop-and-Go driving and even heavy towing can easily start to increase engine temperature, which breaks the oil down and promotes oil sludge development. If possible, try to avoid driving during heavy rush hour traffic. If you use your vehicle to tow, always ensure you are well below 80% of the maximum towing capacity rated in the owner’s manual.
4. Oil Treatment for Older Cars
If you have an older car with more than 75,000 to 100,000 miles, fuel and oil treatments formulated to help keep the engine clean are always a good idea. The oil treatments are usually added during an oil change, and you can use the fuel treatments like injector cleaners every 3,000 to 5,000 miles. Not only can they help keep your injectors clean, but they can also help reduce the blow-through contaminants that can sometimes get into your oil.
5. Stay On Top of Simple Repairs and Routine Maintenance
Contaminants from other mechanical faults and fluids getting into the oil are the second most common cause of engine sludge. A blown head gasket allows coolant into the oil, soot from the engine running rich, and moisture can contaminate oil or affect its viscosity.
Frequently Asked Questions
Do I Need to Deal with Oil Sludge If the Engine is Running Normally?
If you’ve gone too long without getting an oil change or noticed signs of oil sludge in your engine, the wise move is to be proactive and remove it. Given enough time, even a minor problem with oil sludge will affect engine performance and risk fouling other parts. At the very least, you need to perform an engine flush and have an oil change with the best possible oil recommended by the manufacturer.
Can I Use a Power Washer to Remove Caked-On Grease from My Engine?
Power washers can come in handy for removing caked-on grease from an engine. They don’t use a large volume of water and will easily blast away loose debris. Though you’ll likely still need to clean some extra greasy areas manually.
The concern with a power washer is that the pressurized water spray might break through plastic bags and other things you use to protect sensitive components in the engine bay. A high-power pressure spray from a power washer can potentially damage loose wires, compromised hoses, and sensitive electronics. You also run the risk of fouling the electronics in the alternator. It’s an awful lot of expensive risk to save 10 or 15 minutes.
Conclusion
Removing oil sludge and caked-on grease from your engine is easiest if you catch it early. A simple sludge cleaner oil additive, with a complete flush and oil change, will help get the bulk of the sludge out of the oil system. Then a quality oil additive and another high-quality oil change another 500 to 1,000 miles later will help run the oil system smoothly.
Though if you have an oil warning light or a check engine light come on, chances are good you’ll need to clean the oil sludge out of sensitive areas manually. Cleaning valve covers, oil pans, and uptake lines are usually beyond what a DIY mechanic can handle on their own. There’s also a good chance that the oil pump is fouled, and you’ll need a mechanic to handle those cleaning and replacement jobs.
Caked-on grease is usually something you can handle on your own. You’ll just need a high-quality engine degreaser, a variety of brushes, rags, and a whole bunch of elbow grease. You might be tempted to use a pressure washer or a garden hose, but that comes with the risk of damaging one of the many sensitive components in the engine bay.
Once you’ve removed the caked-on grease and oil sludge from the inside and outside of your engine, you’ll need to stick to some good, old-fashioned routine maintenance. Routine oil changes, with high-quality oil and special treatment additives, as well as staying on top of other repairs, will go a long way toward preventing sludge and caked-on grease from developing again.
Written By
Jason Farrell
Jason Farrell is a certified master technician, the editor of Mechanic’s Diary in Pittsburgh, Pennsylvania. He is ASE (Automotive Service Excellence) certified and earned a Bachelor’s Degree in Automotive Technology from Pittsburg State University. With nearly 18 prior years of experience in the automotive field, he has extensive knowledge about Domestic, European, and other foreign makes and models of cars and light trucks. Jason’s experience working as a technician and service manager at dealerships, gave him the experience and know-how of most aspects of inspection, diagnosis, and repair from engine and drivability to electrical, HVAC, brakes, steering and suspension and everything in between.